Thursday, July 19, 2012

Powershell: Working with CSV Files

Today I'm going to talk about interacting with CSV files using powershell.  You may use CSV files to store values temporarily for a script, or you may be creating user accounts in Active Directory.  I'll be going over the process of how to read the file and declare variables for the headers.

The root of the whole process is importing a CSV file you've created.  The command to do this is:

Import-Csv pathtocsvfile

So that reads the file but how do we interact with the data?  The following example shows how you can process a csv file one row at a time.  This script simply echoes the data stored in the 2 columns in the csv file.


 $testcsv = import-csv c:\scripts\test.csv


 foreach($test in $testcsv)
  
   {
  
   $field1 = $test.field1
  
   $field2 = $test.field2


   Echo "$field1, $field2"
  
   }


So to break this out piece by piece:

1. This imports the csv file and stores it in the variable $testcsv

$testcsv = import-csv c:\scripts\test.csv

2.  This starts a "foreach loop" to process the csv file row by row.  The first variable, $test, can be named anything you want it to be.  I find it good practice to name it something relevent to the import-csv variable.  The second variable is the one we defined earlier for importing the csv file.

foreach($test in $testcsv)

3. Start the loop with a {

{

4.  This part is how we tie variables to the column headers in the csv file.  Again, name these what you want.  I like to name them after the column headers.  Set them equal to the $test variable dot (.) the column header they are tied to.

$field1 = $test.field1
$field2 = $test.field2


5.  This is the command we are going to run each row through.  Use the variables from the last step in the command.  Here we are telling powershell to echo field1 and field2.  Again, each row in the csv will run through this command.

Echo "$field1, $field2"

6.  Close the foreach loop with one of these }

}


My csv called test.csv looks like this:

Field1,Field2
data1,data2
data3,data3

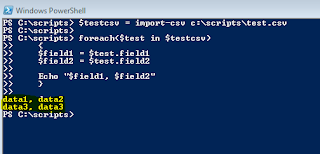
When I run this script in powershell, I see the output of rows 1 and 2:


Create Active Directory Accounts from a CSV file with Powershell


Here's another example of how you can create Active Directory accounts using this method.


 ##########################################################################
  
 #     Create Active Directory Users from CSV
  
 #
  
 # This script will allow you to import users from a csv file
  
 # and create an active directory account for each of them. This requires
  
 # your domain and forest functional level to be 2008 R2.
  
 #
  
 # Source: ps1scripting.blogspot.com
  
 #
  
 ##########################################################################


 #Imports active directory module for running AD cmdlets
  
 Import-Module active directory


 #variable to store the data in adusers.csv
  
 $adusers = Import-csv c:\scripts\adusers.csv


 #This will process the CSV row by row. Each row contains information to create an active directory account for a user.
  
 foreach ($user in $adusers)
  
   {


   $username = $user.username
  
   $password = $user.password
  
   $firstname = $user.firstname
  
   $lastname = $user.lastname


   #create AD Acct #sets for username  #sets account name      #sets first name   #sets lastname  #enables account #sets display name        #sets login script path
  
   new-aduser -samaccountname $username -name "$lastname, $firstname" -givenname $firstname -surname $lastname -enabled $true -displayname "$lastname, $firstname" -scriptpath "\\server\loginscript.bat" -accountpassword (convertto-securestring $password -asplaintext -force)


   }  


I like to automate the Active Directory account creation process by using SQLCMD to select users from a SQL database and output them to a csv file.  Set these scripts up as scheduled tasks and let powershell do the rest!


Disclaimer: All scripts and other powershell references on this blog are offered "as is" with no warranty.  While these scripts are tested and working in my environment, it is recommended that you test these scripts in a test environment before using in your production environment.
Tuesday, July 17, 2012

Active Directory: Restore User from AD Recycle Bin

Ever deleted accidently deleted a user from active directory only to find that they need their account restored?  You can recreate the account manually but the SID (security identifier) will be different the second time around causing you to have to reestablish group membership, folder permissions, remount Exchange mailbox, etc. 

If you are running a Windows 2008 R2 domain environment with your domain and forest functional level at 2008 R2, there's a handy new feature call the Active Directory recycly bin.  This is only accessible through powershell which is kind of a bite, but in the script below, I've integrated a simple .net form with the cmdlet required to perform the object restore.  You will have to enable this feature first to use it and there's no going back if you do (why would you want to?).

To enable this feature, run powershell as administrator and run the following cmdlet and replace all instances of "yourdomain.com" with your AD domain info.

 Enable-ADOptionalFeature –Identity ‘CN=Recycle Bin Feature,CN=Optional Features,CN=Directory Service,CN=Windows NT,CN=Services,CN=Configuration,DC=yourdomain,DC=com’ –Scope ForestOrConfigurationSet –Target ‘yourdomain.com’
  

As I mentioned above, I am using a simple .net form to create somewhat of a nice GUI for running this cmdlet.  I got the form from here:  http://technet.microsoft.com/en-us/library/ff730941 .  Check out this page if you'd like to learn more about it.

When you run the script below, you will see the following window pop up:

Simply type in the account name of the user that was deleted and click ok.  Like magic, the user with their SID is restored.  Their exchange mailbox is automatically reconnected (if it still exists and isn't connected to another account), and they should have access to any folder they did before.  It's like they were never deleted.  Here's the script, save it as Restore_AD_Account.ps1


 ######################################################################################  
#           Restore Active Directory Account  
# This script utilizes the Windows 2008 R2 AD ability to undelete an account  
# Your forest and domain functional level must be 2008 R2  
#  
# Source: ps1scripting.blogspot.com  
#  
#
#####################################################################################
  
  
[void] [System.Reflection.Assembly]::LoadWithPartialName("System.Drawing")   
[void] [System.Reflection.Assembly]::LoadWithPartialName("System.Windows.Forms") 
  
   
#The objform.txt names the form window  
$objForm = New-Object System.Windows.Forms.Form   
$objForm.Text = "Restore Active Directory User"  
$objForm.Size = New-Object System.Drawing.Size(300,200)   
$objForm.StartPosition = "CenterScreen"


$objForm.KeyPreview = $True  
$objForm.Add_KeyDown({if ($_.KeyCode -eq "Enter") 
  {$x=$objTextBox.Text;$objForm.Close()}})
$objForm.Add_KeyDown({if ($_.KeyCode -eq "Escape") 
     {$objForm.Close()}})


#This labels the OK button
$OKButton = New-Object System.Windows.Forms.Button  
$OKButton.Location = New-Object System.Drawing.Size(75,120)  
$OKButton.Size = New-Object System.Drawing.Size(75,23)  
$OKButton.Text = "OK"  
$OKButton.Add_Click({$x=$objTextBox.Text;$objForm.Close()}) 
$objForm.Controls.Add($OKButton)
  
   
#This labels the cancel button
$CancelButton = New-Object System.Windows.Forms.Button 
$CancelButton.Location = New-Object System.Drawing.Size(150,120)
$CancelButton.Size = New-Object System.Drawing.Size(75,23)  
$CancelButton.Text = "Cancel" 
$CancelButton.Add_Click({$objForm.Close()})  
$objForm.Controls.Add($CancelButton) 
  
#This gives a description in the window  
$objLabel = New-Object System.Windows.Forms.Label  
$objLabel.Location = New-Object System.Drawing.Size(10,20)   
$objLabel.Size = New-Object System.Drawing.Size(280,20) 
  
$objLabel.Text = "Please enter the username you'd like to restore below:"  
$objForm.Controls.Add($objLabel) 
  
  
$objTextBox = New-Object System.Windows.Forms.TextBox 
$objTextBox.Location = New-Object System.Drawing.Size(10,40)   
$objTextBox.Size = New-Object System.Drawing.Size(260,20)   
$objForm.Controls.Add($objTextBox) 


$objForm.Topmost = $True
  
   
$objForm.Add_Shown({$objForm.Activate()})  
[void] $objForm.ShowDialog()
  
 
#$x variable is passed to powershell cmdlets below
$x
  
#imports active directory module to run AD cmdlets
Import-Module activedirectory
  
#searches AD for object stored in variable by samaccount name and restores it 
get-adobject -filter {samaccountname -eq $x } -includedeletedobjects | restore-adobject


This is really a very simple script.  95% of it is just the code required to construct the form.  Let me know if you have any questions.


Disclaimer: All scripts and other powershell references on this blog are offered "as is" with no warranty.  While these scripts are tested and working in my environment, it is recommended that you test these scripts in a test environment before using in your production environment.


Monday, July 16, 2012

Active Directory: User Password Expiration Notice

Active directory password expiration notifications that are built in can be easy to missed by users.  They occasionally show up as a bubble in the notification area on your desktop which are easily overlooked.  They also show up in Outlook web access as a little gold bar that blends in too well with its surroundings and is also often overlooked. 

The script below will provide you with an email message that tells you how many days until  your password expires.  You can configure this to run how ever many days in advance that you want by changing the numbers in the "if statements".  You will want to configure the number in parenthesis in the $passexpirationdate variable per your domain password policy.  If you don't know your max password age you can easily view it by running the following commands in powershell:

Import-Module ActiveDirectory
  
Get-ADDefaultDomainPasswordPolicy  

Set it up as a scheduled task to run daily and it will continue to email your users until they change their password.  Here's the script with comments on what each portion does.  Save it as password_exp_notice.ps1:


 ##############################################################################################
  
 #           Password Expiration Notification 
 # 
 # This script is designed to notify users via email of an upcoming password change. 
 # This script requires your forest and domain functional level to be 2008 R2. 
 # You must have active directory client tools installed to run this or run it from a DC.
 #
 # Source: ps1scripting.blogspot.com
 # 
 #
##############################################################################################


 #Loads the active directory module to enable AD cmdlets 
 import-module activedirectory
  
 
 #Queries all accounts in AD domain and stores them in username variable 
 $username = get-aduser -filter * | select -ExpandProperty samaccountname
  

 #Foreach loop is run against each account stored in the username variable 
 foreach($user in $username){
  
   #gets current date and stores in now variable
   $now = get-date
  
   #gets date of when password was last set for a user
   $passlastset = get-aduser $user -properties passwordlastset | select -ExpandProperty passwordlastset


   #calculates password expirationdate by adding 60 days to the password last set date
   $passexpirationdate = $passlastset.adddays(60)


   #calculates the number of days until a user's password will expire
   $daystilexpire = $passexpirationdate - $now | select -ExpandProperty days


     #if statement to select only accounts with expiration greater than 0 days
     if($daystilexpire -gt "0"){
  
  
       #if statment to further filter accounts from above if statement. This selects accounts with less than 5 days until expiration.
       if($daystilexpire -le "5"){


         #generates email to user using .net smtpclient to notify them of how many days until their password expires.
         $emailFrom = "emailaddress@yourdomain.com"
         $emailTo = "$user@yourdomain.com"
         $subject = "Password Expiration Notice"
         $body = "Your password will expire in $daystilexpire days. Please change your password soon to avoid being locked out of your account."
         $smtpServer = "Enter IP address of your SMTP Server Here"
         $smtp = new-object Net.Mail.SmtpClient($smtpServer)
         $smtp.Send($emailFrom, $emailTo, $subject, $body)
  
  
       }
      }
   }


There it is.  A quick easy script that is sure to save you several calls about account expirations.  Feel free to leave comments, questions, or ideas for improvement.  Thanks for reading.

Disclaimer: All scripts and other powershell references on this blog are offered "as is" with no warranty.  While these scripts are tested and working in my environment, it is recommended that you test these scripts in a test environment before using in your production environment.

Sunday, July 15, 2012

Powershell: Scratching the Surface

Powershell: Scratching the Surface


I started using powershell a few years back to automate the creation of Exchange emailboxes in our Exchange 2007 system.  I used some borrowed code and modified it to fit our environment.  At the time I was able to figure it out just good enough to get it working.  I've since made a lot of progess with learning the scripting language and have not found many things I can't do with it.  If you are familiar with writing cmd batch files, this should come fairly easy to you.

Powershell to me seemed a bit intimidating at first because of the complexity the cmdlets could reach.  I've since learned that it is very easy to use once you understand some of the base concepts.  About a year ago, I was determined to learn more about it and have progressed greatly in my ability to write scripts.  I've found a lot of help out there from numerous online resources and would like to pull what I know into this blog to help others get started.  I'll start with some basics here and work my way into some more advanced scripts.  

Example 1: Simple text output


For starters, lets do some "Hello World" examples.  This first example is how you can simply output the text "Hello World" in the command shell window.

write-host "Hello World"

This is as simple as it gets.  Notice that the command write-host is a verb-noun combination that produces a result.  Most powershell cmdlets revolve around this concept, which to me makes it much easier to remember commands.  A lot of powershell commands have a shorter equivelent command.  For example:

Echo "Hello World"

Echo, which you remember from DOS and cmd prompt produces the same result as write-host.  Another example:

get-childitem

dir

Some cmdlets also have short acronyms you can use instead of typing the full command such as:

gci

Gci will give you the same directory listing output as get-childitem or dir. 

Anyway, back to hello world.  So say you want to output a string of text to a file to store for later use or review.  You can accomplish this in this way:

echo "Hello World" | out-file c:\scripts\helloworld.txt

You can append text to that same file this way:

echo "Hello World" | out-file c:\scripts\helloworld.txt -append

In some cases you may run into a program that isn't able to properly decode the default encoding scheme.  Let's set the encoding to ascii by doing this:

echo "Hello World" | out-file -encoding ascii c:\scripts\helloworld.txt -append

Now, lets say you want to read the text from the helloworld.txt file you just created.  You can accomplish this by doing the following:

get-content c:\scripts\helloworld.txt

This will display the contents of the helloworld.txt file in the powershell console.

Example 2: Simple Variable Usage

Learning the ins and outs of variable usage in powershell is very important because you'll use them in almost every script you write.  All powershell variables are preceeded by a $ and are connected to a value using a  = .  For example:

$value1 = 5
$value2 = 7

Powershell is also equiped with mathematical functionality.  After creating the variables above, try this:

$value1 + $value2

You should see an output of "12" on your screen as powershell performed an addition function in this last command.

Here's another way you can use variables to store a value.  Lets pull the data from the helloworld.txt we created in the last example.

$hello = get-content "c:\scripts\helloworld.txt"

Now that we've stored the contents of the text file in the variable, lets run it by typing the following:

$hello

This displays the contents of the text file in the console.

Lets combine this with some other text.  Type the following:

write-host "$hello, how are you?"

Now you have combined the contents of the text file with the additional provided text to create a single output in the console.

This concludes my first post.  Hope it was helpful.  For questions or comments, please email ps1scripting@gmail.com